When the battery in a wireless mouse starts to run out, you will get a choppy and laggy movement of the mouse cursor. Sometimes, it will not respond for a few seconds before coming alive again. Some wireless mouse will have a led indicator that will let you know when the battery is running low. If you are facing similar issues, in this article we will show you how to change the battery in a wireless mouse.
How to Know Your Mouse Is Low on Battery?
How to Change Wireless Mouse Battery
A mouse with a low battery leads to a less-than-ideal experience, impacting your productivity negatively. If your mouse is showing signs of low battery, it’s a good idea to change them asap. So, let’s change your wireless mouse’s battery now!
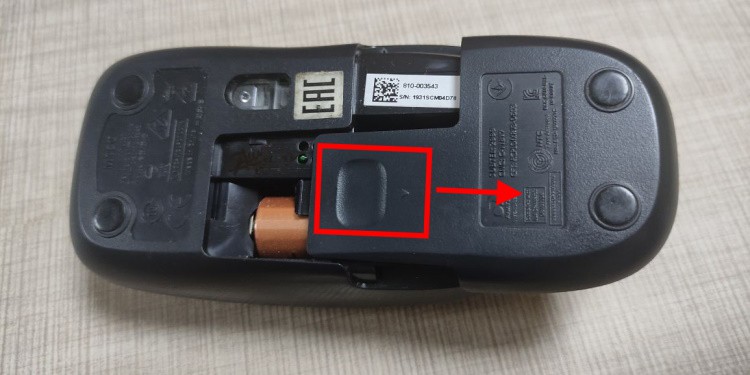
Locate the Battery Compartment Cover and Open It
Most wireless mouse have their battery compartment located on the underside. Some will have them on top; refer to the device manual that came with your mouse if you are unsure where it is located. If the compartment is on the bottom, flip the mouse over. If there is an on-off switch, set the switch to off. The battery compartment will have a groove and a direction indicator towards where you need to slide it to open. Hold the mouse securely, then place your thumb in the groove and apply pressure in the direction indicated to slide the compartment cover open.
Carefully Remove the Battery/batteries
Now that you have removed the battery compartment cover, batteries should be exposed. Most wireless mouse with replaceable batteries are designed to use either AAA or AA standard batteries. Some run on a single battery, while others need a pair. In either case, remove the batteries. If they are stuck tightly in the compartment, use a tool. You don’t need a specialized tool – a key can be useful here. Take care while disposing of batteries.
Insert New Batteries Into the Compartment
Insert new batteries into the compartment. Make sure that the positive and negative ends of the battery match the ones in the compartment. For reference, the negative end of the battery should go into the spring end in the compartment.
Close the Battery Compartment and Turn On the Mouse
Reverse the process you utilized to remove the battery compartment to close it back. If there is a switch for on-off, set it to on. Your wireless mouse battery is now changed and ready to use.
Can I make the Battery Life Last Longer?
With proper care, you can make your wireless mouse’s battery last longer. I for instance, always follow these two tips for durability:
Switch Off Mouse When Not In Use
If you want to maximize battery life for your wireless peripheral, there are some precautions you can take. One of the most basic strategies is to switch off the device when not in use. Even if your mouse automatically goes to sleep mode when not used for an extended period, any accidental movement can still wake it up, expending stored energy. Over time, such habits can have a cumulative effect on battery life. Thus, it is best to switch the device off when not in use.
Use a Light Colored Surface With Better Reflection
Modern mouse work by detecting the radiation reflected back from the surface it is sitting on top. Dark-colored surfaces absorb more radiation than light-colored surfaces, which could mean that your mouse has to work harder to function similarly. This will have a negative effect on the battery life. Thus, use a light-colored surface when possible.
Keep Your Mouse and Receiver Close
Your mouse will connect either wireless via radio waves to a receiver attached to your computer or directly through Bluetooth. Regardless, the greater the distance you put between the mouse and your computer, the larger the signal loss, and your mouse will have to use more power to communicate with the PC. This will affect the battery life negatively. As such, keep them as close as possible.