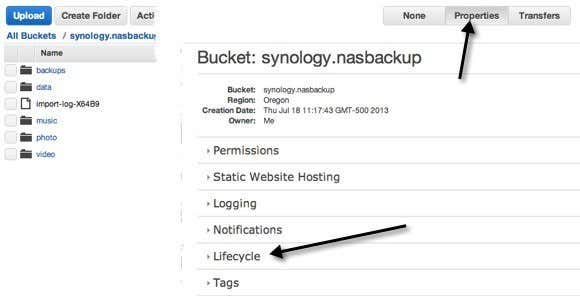
Next click on the bucket name that contains the data you want to transfer to Glacier. Note that you will be able to either transfer the entire bucket, just folders or even specific files only.
When you open a bucket, you’ll see the content of the bucket on the left hand side. Click on Properties at the top right to open the settings for that bucket.
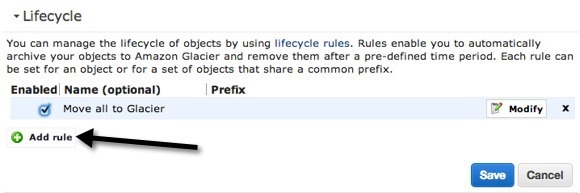
At the bottom, you’ll see Lifecycle. Go ahead and expand Lifecycle to see your current rules, if any. I have one setup already which transfers everything in the bucket to Glacier after it’s uploaded to S3.
To setup a new rule, go ahead and click on Add rule. The new Lifecycle rule dialog will pop up as shown below.
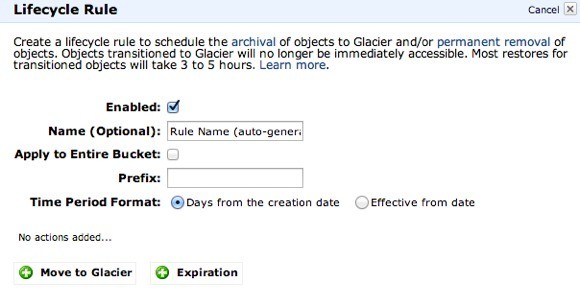
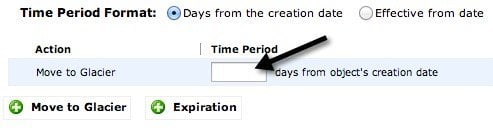
Now let’s go through the different options. Firstly, you can give it a name, which can be whatever you life. The Apply to Entire Bucket check box will apply the rule to all files and folders inside the bucket. If you want to only move a certain portion of the data to Glacier and leave the rest in S3, then do not check the box. Instead, you can enter a Prefix, which is the name of the file or folder you want to move to Glacier. For example, if I wanted to just move the music folder in my bucket to Glacier, I would type music/ in the Prefix box. To specify a file, you type in the path like music/mymusic.mp3. Next is Time Period Format. You can either choose from Days from the creation date or Effective from date. This option lets you choose when you want the objects you specified to be moved into Glacier. If you choose Days from the creation date, you can say, for example, that you want to move the data to Glacier after 10 days. This means when the file is data is first uploaded to S3, it will be moved to Glacier after 10 days of being created. Effective from date will let you just specify a date in the future at which point the data will be transferred to Glacier. You have to click on the Add Transition button in order to specify the time period. My screenshot says “Move to Glacier”, but that’s because I already created a rule. When you click Add Transition, you can type in the number of days or the date. Note that if you type in 0 for the number of days, then the data will be moved immediately the next time the rule is run.
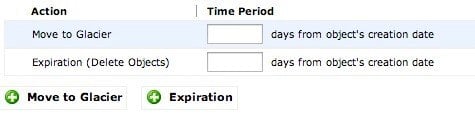
There is also an Expiration button, but be careful with this. Again, depending on what you chose from Time Period Format, you can either specify a number of days or specific date in the future. Adding an expiration means the data will be deleted after the time you specify. It’s important to remember that it will be deleted from S3, RRS and Glacier. So basically it’s completely gone if you choose to add an expiration.
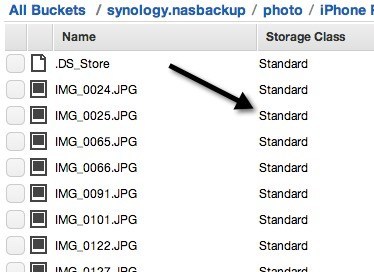
If you don’t add an expiration, the data will always remain in Glacier and not be deleted. That’s pretty much it. Once you save the rule, the rule will be run once a day. If your rule matches the criteria you specified, the data will be transferred. There are a few things to note about this process. Firstly, you can tell your data has been moved to Glacier by checking the Storage Class. If it’s Standard, that is S3. If it’s RRS, that is Reduced Redundancy. The third class is Glacier, which means it’s now stored there.
Another thing to note is that when you move data from S3 to Glacier, you still have to access it from S3. If you upload data straight to Glacier, it will show up in the Glacier console when you log into AWS. However, moving data using Lifecycle rules means the data will be stored in Glacier and you’ll be charged Glacier prices, but you’ll have to access the data from the S3 console. Kind of confusing, but that’s how it works.
Retrieving Data from Glacier
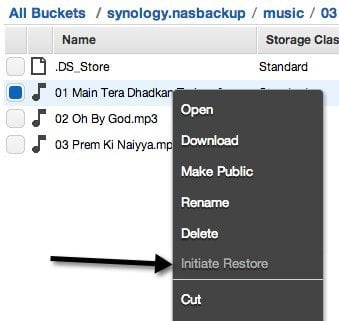
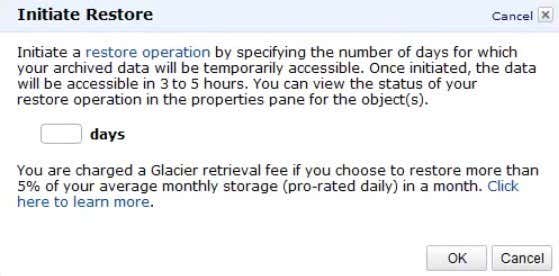
Getting data back from Glacier is also pretty straight-forward. The thing to remember about Glacier is that data is not immediately accessible like in S3. With S3, you can download any file any time. With Glacier, you have to wait about 3 to 5 hours for the data to be retrieved and put back into S3. That’s also why it’s so much cheaper. To start a restore, select the file or folder that you want to retrieve and then right-click on it. You’ll see an option called Initiate Restore.
If the option is disabled, that means the file is not stored in Glacier. When you restore, you’ll have to choose how long you want the data to be accessible in S3.
Note that the files are restored to S3 RRS (Reduced Redundancy) storage class, which is a little bit cheaper than S3 Standard. Also note that you cannot permanently restore the data, it will be deleted eventually. I’m not sure what the largest value you can enter for days to keep the data, but it’s not forever. Also, you have to pay the higher fees the longer that data sits in RRS storage class, so it’s better to keep the duration short. To see the status of a restoration, just click on the file or folder you restored and click on Properties. It will say Restoration in Progress. When the restore is complete and you click Properties again, you’ll see the date that the restore will be kept to. Overall, getting your data from S3 to Glacier is very easy. Just create one rule and you’re done. Moving data to Glacier can mean big savings if you have a lot of data on S3. If you have any questions, please post a comment. Enjoy!